Finishing Exotic And Tropical Hardwood - A "Primer"

Finishing Exotic And Tropical Hardwood - A "Primer"
by Eric Meier of The Wood Database
Have you ever had a project that was coming along nicely up until the finishing step? You apply the polyurethane to the wood, and wait for it to dry. And wait. And wait. And finally, days, weeks, (or even months!) later, the finish has still not dried. What went wrong, and how do you solve this problem?

Before proceeding much farther, you should ensure that you are using a fresh and well-stored finish. Very old or improperly stored finishes may have difficulty curing. Also, many complications can arise between low-quality wood stains and polyurethane, so be sure to test on a scrap piece before any large project. If the finish seems to be drying on most regular wood surfaces, but it will not harden on an exotic wood, consider the following:
WHY OIL-BASED FINISHES DO NOT DRY ON MANY EXOTIC WOODS
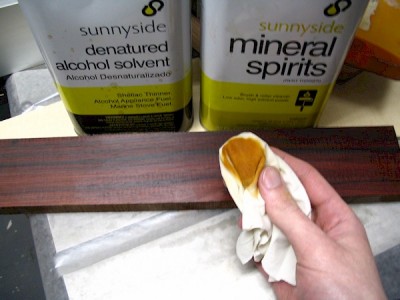
Unlike many of the comparatively tamer domestic hardwoods that woodworkers in the United States, Canada, and the United Kingdom are used to working with, many trees in tropical climates have unique chemical compositions in their heartwood extractives. Many of these compounds are readily soluble in various solvents found in finishing agents, (something that’s evident when wiping a wood with a solvent prior to gluing).

WHAT GOES WRONG
Oil-based finishes, such as polyurethane, are reactive finishes. That is to say, they undergo a chemical reaction as the solvent in the finish evaporates—ultimately causing the finish to cure and harden. The problem occurs when compounds in the wood (more specifically, antioxidants) leach into the applied finish, preventing this chemical reaction from ever occurring. Without the necessary reaction, the finish remains tacky indefinitely.
WHAT CAN BE DONE?
If you have already applied polyurethane to a bare exotic wood surface, there’s not much that can be done to redeem the existing finish. You’ll more than likely have to scrape, sand, wipe, or otherwise remove the existing finish as best you can, and start over from square one. A mineral-spirits soaked rag can usually remove the bulk of the finish.
Since reactive finishes simply can’t cure on exotic woods, what is needed is an intermediate coating between the bare wood and the final polyurethane topcoat. In contrast to reactive finishes, there are also evaporative finishes. Evaporative finishes differ from reactive finishes in that they are generally simpler, and do not undergo any sort of chemical reaction to cure or harden. A resin or other material is dissolved in a solvent, and once the solvent evaporates, a thin film is left behind. In the case of evaporative finishes, the antioxidants may still leach into the finish, but this fact is moot, as the solvent will still evaporate, and the finish will inevitably harden.
A couple examples of evaporative finishes would be nitrocellulose lacquer and shellac. In a number of low-wear applications, either of these two finishes could legitimately be used as a substitute for polyurethane in a completed project. However, neither have quite the same durability and scratch-resistance as polyurethane, so it may be preferable to simply use an evaporite finish as an intermediate layer between the raw wood and the topcoat. For this purpose, shellac greatly excels in suitability.
SHELLAC IS YOUR FRIEND
Shellac makes an excellent sanding sealer and intermediate coat between bare wood or stains/colorants and the final topcoat(s). There’s an adage among woodworkers about shellac that may not even overstate its usefulness as a wood finishing agent:
Shellac sticks to everything, and everything sticks to shellac.
This is as close to a silver bullet as woodworkers are going to get. Simply apply a few coats of dewaxed shellac to seal the antioxidants in the wood, and then apply the topcoat of your choice. For particularly oily woods, two to three coats may be necessary to ensure that there is no interference with the heartwood extractives below.
SOURCING SHELLAC
Shellac is sold in a variety of forms, and has generally received an unjustifiably bad reputation. This is due to its generally short shelf life (about a year once mixed), at which point, ironically, it also begins to have difficulty fully hardening. But freshly-mixed shellac will dry hard and will do so very quickly.
Premixed varieties of shellac can be highly variable in quality. Zinsser produces a line of shellac finishes available in most hardware stores which have their date of manufacture printed on the bottom of the can, helping to ensure that you get a fresh product. The most relevant product to finishing is Zinsser’s SealCoat, which is simply a #2 cut of shellac, (and despite its name, can be used as more than a sanding sealer; it can also be used as a standalone wood finish).
To obtain optimum performance from shellac, it’s best to mix your own. Shellac is about the simplest wood finish to make, as it contains only two ingredients: shellac flakes, and denatured alcohol solvent (DNA). Alcohol solvent is readily available at any hardware store, and shellac flakes can be purchased at woodworker retailers, as well as online. When shellac is mixed, the ratio of flakes to DNA is known as its cut, and is measured in pounds per gallon. So if you mixed three pounds of shellac flakes into a gallon of DNA, you would have a three-pound (#3) cut of shellac.
Simple recipe for homemade shellac sealer
1 cup (8 oz). of denatured alcohol solvent
1 oz. of dewaxed blonde shellac flakes
- Using a postal scale, weigh out one ounce of shellac flakes.
- Pulverizing the flakes in a dedicated blender can help accelerate the dissolution process.
- Pour alcohol into a small, sealable jar, and gradually stir in flakes. (A magnetic stirrer also works very well for this purpose.) Stir or shake jar every 10-20 minutes; flakes should dissolve within a few hours.
- This recipe will make a #1 cut of shellac, which will be a thin, very fast drying sealer that’s easy to apply with a brush or rag. Typically, the second coat can be applied just minutes after the first coat. (With subsequent coats taking slightly longer to dry.)
- For a #2 cut, as would be typical for building a wood finish film, simply double the amount of shellac flakes to 2 ounces.
- Mixing eight ounces at a time makes it easiest to calculate the pound-cut of the shellac: simply substitute ounces for pounds (i.e. 2 oz. of flakes equals #2 cut, 3 oz. equals #3 cut, and so forth.)
- Larger quantities can also be mixed for larger projects: just remember that shellac has a limited shelf life, and the fresher the shellac, the better.
KNOWN PROBLEMATIC WOODS
Below is a non-exhaustive list of woods that have heartwood extractives that tend to interfere with the curing process of oil-based finishes.
- Blackwood, African
- Blackwood, Australian
- Bloodwood
- Bocote
- Cedar, Eastern Red
- Cocobolo
- Cumaru
- Ebony
- Goncalo Alves
- Ipe
- Katalox
- Kingwood
- Lignum Vitae
- Macacauba
- Padauk
- Pau Ferro
- Purpleheart
- Rosewoods
- Teak
- Tulipwood
- Verawood
- Ziricote
-
All About Tonewoods (21)
-
All About Tools (1)
-
Building Electrics (5)
-
Building Skills (11)
-
Driftwood Guitars (6)
-
From The Bench (1)
-
Guitar Building (19)
-
Guitar Maintenance (3)
-
La Due Pragmatic Luthier (7)
-
Guitar Repair (5)
-
Luthier Wisdom (17)
-
Press Releases (3)
-
Schaefer DIY Guitar Making (9)
-
The Builders (72)
-
Workshop Talk (33)


